Introducing 22oz Copper Insulated Water Bottles! Cold for 48 hours & Hot for 12. In the SHOP Now
Best Drawing Supplies for Beginners: Complete Guide Under $20
You don't need expensive supplies to start drawing. This complete beginner's guide covers everything you need to get started for under $20, including the exact tools I used when I picked up a pencil for the first time at 55.
 ByLeona
Want to learn drawing but overwhelmed by expensive art supplies? Here’s the truth: my entire drawing setup costs less than $20.
In my last post, I told you that drawing is a skill, not a talent. Today, I’m sharing exactly which beginner drawing supplies I used—and which expensive tools you can skip.
That need do it like the pros brings us to the second trap beginners face: The ‘Gear Myth’.
The Gear Myth: Why You Don’t Need Expensive Art Supplies
This is 100% true. You do not need a $500 setup to learn the basics. In fact, walking into a big art store can be intimidating. You see rows of $30 papers and marker sets that cost close to $1,000, and you think, “If I don’t buy this, I won’t be good” or “Oh, this is what [insert name] used, I must buy it”.
That is the “Gear Myth,” and it is just as dangerous as the “Talent Myth.”
However, as I worked through my drawing journey, I discovered that while you don’t need fancy gear, having the right gear can make the difference between a frustrating practice session and a fun one.
I didn’t spend a fortune. In fact, my entire “studio” fits in a small drawer. But there are a few specific tools, totaling around $20—that helped me go from “messy scribbles” to “clean shading.”
Here is exactly what I use.
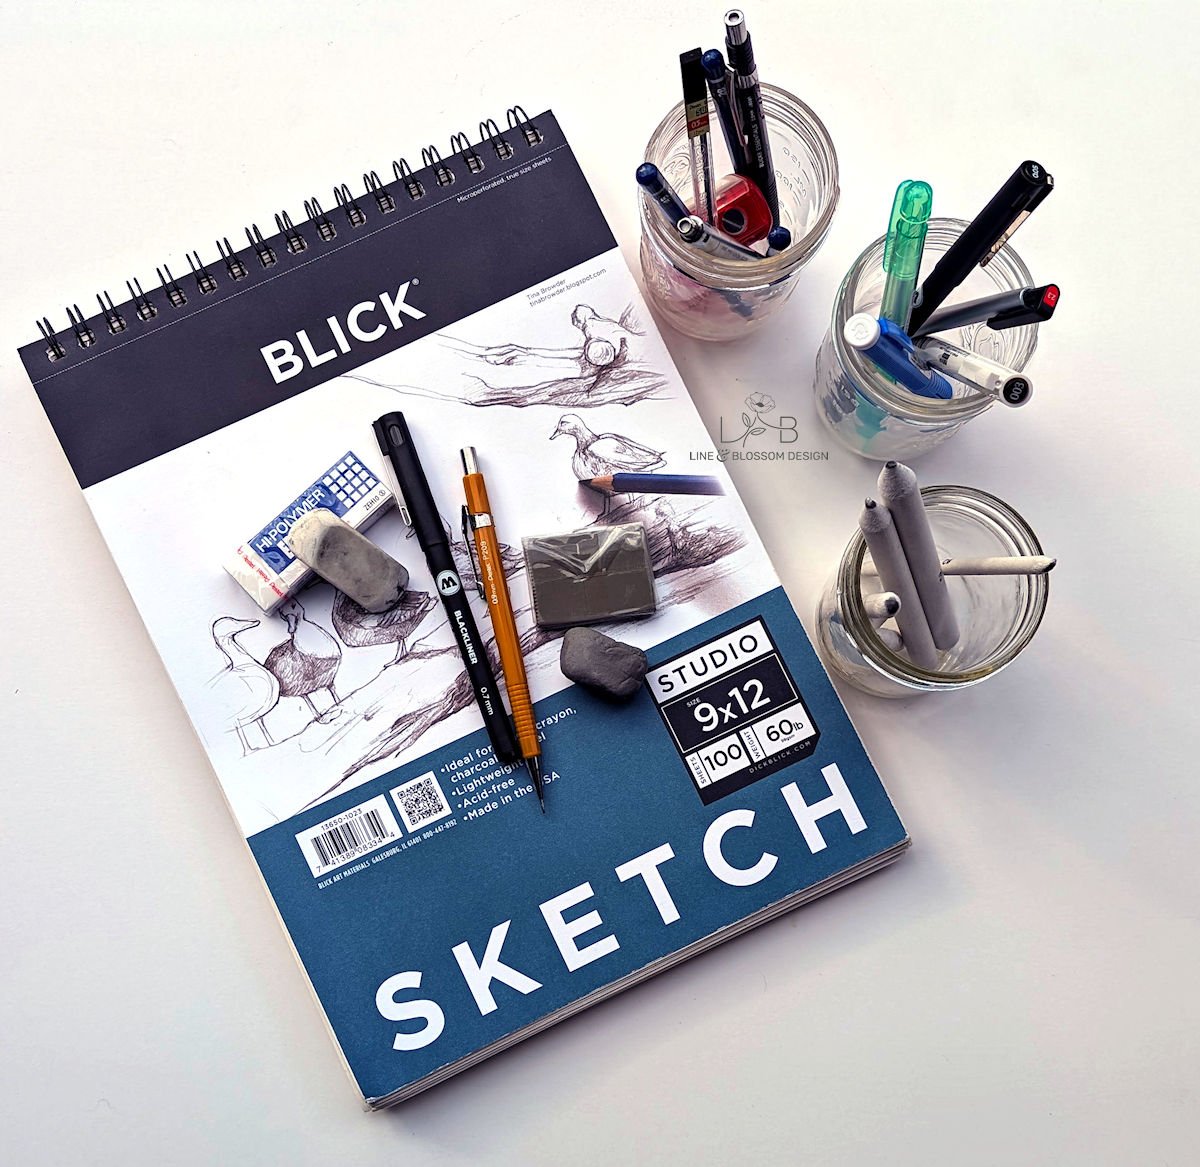
File name: beginner-drawing-supplies-flat-lay-under-20-dollars-sketchbook-blending-stumps.jpg
Alt text: Essential beginner drawing supplies including sketchbook blending stumps kneaded eraser mechanical pencils and drawing tools organized in mason jars under 20 dollars
Caption: My complete beginner drawing setup: under $20 total. Blick sketchbook, basic erasers, blending stumps, and mechanical pencils—everything you need to start.
What Art Stores Want You to Buy vs. What You Actually Need
Before we dive into my list, let’s bust some myths:
| Art stores want you to buy: | What you actually need: |
| $50 professional pencil set | $3 mechanical pencil with 2B lead |
| $30 specialty drawing paper | $5 beginner sketchbook |
| $25 blending tools set | $2 pack of blending stumps |
| TOTAL: $105 | TOTAL: $10 |
| TOTAL SAVINGS $95 | |
Now, let me show you my actual setup.
My Complete Drawing Supplies List for Beginners
1. The Foundation: You Can Draw in 30 Days Book
First things first. You need the instructions.
Item: You Can Draw in 30 Days by Mark Kistler
Why: This isn’t just a book of pretty pictures; it is a workbook. It gives you the specific “laws” of drawing that tell you where to put your pencil. Without this, the rest of the tools are just clutter.
Budget Tip: Don’t forget this can be bought used, or even borrowed from your local library.
Read my full review of this book and how it changed my life
2. Best Pencils for Beginner Artists (Start Free!)
You might expect me to list a specific brand of graphite here, like Staedtler, Derwent, or Faber-Castell. But the truth? I started with Bic mechanical pencils that I already owned (a set of ten costs less than $3).
Here’s what matters: Mark Kistler’s method is about structure and shading, and you can absolutely learn that with a standard mechanical pencil. They stay sharp, they are consistent, and best of all, you probably already own one or several. Don’t let a lack of “art pencils” stop you from starting Day 1.
Fun Fact: Mark Kistler himself uses a simple Pentel P209 mechanical pencil with 2B lead for his drawings to this day.
Later Upgrade Option 1:
Eventually, I did pick up a better quality mechanical pencil, I used the Pentel P205 (0.5mm instead of 0.9mm lead size) and a pack of 2B lead. This is a softer lead than a standard #2 (HB) school pencil, which allows you to get those really dark, dramatic shadows that make a drawing “pop” off the page. Choose the mechanical pencil that feels right to you. It needs to feel comfortable in your hand. If the pencil you used feel odd or weird when you hold it, look at other brands. If mechanical pencils just aren’t your thing look to option 2.
Cost: $6-$9 total
Later Upgrade Option 2:
Out of curiosity, I purchased some individual Blick graphite pencils in 2B, 4B, and 6B for experimentation. The incessant need for sharpening made me prefer my mechanical pencil, but having the other choices of B pencils was worth it down the line. For many drawing with traditional pencils just feels right in the hand. If this is you, go for it and purchase a 2B pencil and manual sharpener
Cost: $1-$2 per pencil (plus cost of sharpener)
My recommendation: Start with whatever pencil you have. Upgrade to a mechanical pencil with 2B lead when you’re ready. Sorry, I won’t apologize for preferring mechanical pencils over traditional ones.
3. Choosing Your First Sketchbook (Under $5)
Can you draw on printer paper or the back of junk mail? Absolutely. There is nothing wrong with using either of these. In fact, re-purposing junk mail to get in some extra practice feels pretty good.
However, I am lucky enough to live just two miles from a Blick Art Materials store. I decided I wanted an official sketch pad for my journey to learn to draw.
Cost: Less than $5 (and still does)
But the value wasn’t just in the paper quality (though having a little “tooth” or texture really helps hold the shading). The real value was psychological. Buying a “real” sketch pad made me feel official. It signaled to my brain that this wasn’t just doodling; I was serious.
If $5 helps you take yourself seriously, it is money well spent.
What to look for:
- 9×12 size or smaller if you prefer (standard and portable)
- 60-80 lb paper weight
- “Medium tooth” or “sketch” paper
- Spiral bound (so pages lay flat)
Where to buy:
- Blick Art Materials
- Michaels (use their coupons!)
- Amazon
- Your local craft store
4. The Game-Changer: Blending Stumps for Clean Shading
If you only buy one “extra” thing, make it this.
Mark Kistler teaches a technique called “smudging” to create 3D depth. Most people just use their fingers to rub the graphite. I cannot do that.
I absolutely despise having my hands dirty. It is a lifelong trait. As a child, I used to help my Dad work on his Dune Buggy. He eventually learned to just accept the fact that I would run back into the house every 10 minutes to scrub the grease off my hands, only to come back and repeat the process.
Graphite is just as messy as grease. It smears on the paper, it gets on your clothes, and it feels gross.
The Solution: A Blending Stump (Tortillon)
What it is: A tightly rolled piece of paper that looks like a pencil.
Why I love it: It costs pennies, but it allows me to blend smooth, professional shadows without getting a single smudge on my skin. It keeps my drawings looking sharp and my hands feeling clean.
Cost: $2-3 for a pack of 2-3 stumps
Where to buy: Any art supply store or Amazon, I have even seen them at Walmart.
Pro tip: When one end gets too dirty with graphite, just use the other end. When both ends are saturated, use sandpaper to “sharpen” them clean again. You don’t need the special sharpener, it’s just a piece of sandpaper laid on a hard surface.
5. Three Essential Erasers (And What Each One Does)
Finally, I use three types of erasers. Two of them are used as drawing tools to create highlights and bring back the white of the paper. (I admit one was, and is, used for fixing mistakes!)
The Hi-Polymer Eraser
What it is: This is a latex-free white block eraser that removes graphite without smudging or ruining your paper. This simple tool makes undoing “oops” moments much easier. It is also good for lightening and eventually erasing all those pencil lines that are drawn over by a Micron pen or another permanent ink pen. That is another story for later.
Why you need it: General-purpose erasing for mistakes
Cost: $2-3
The Kneaded Eraser
What it is: This looks like a piece of gray putty. You dab it on the paper to lift graphite off without leaving those annoying “crumbs” everywhere.
Why you need it: Creates soft highlights, lightens areas, lifts graphite without damaging paper. It might feel like weird silly putty, but what it can do to create shifts in shading is awesome.
Cost: $2-3
Pro tip: Knead it like silly putty between uses to expose clean surface.
The “Click” Eraser
What it is: This is a retractable eraser that looks like a pen (the Tombow Mono Eraser is amazing due to its small size). It is perfect for carving out sharp highlights, like the shine on an apple or the glint in an eye (drawing with white). These do come in various sizes.
Why you need it: Precision erasing for fine details
Cost: $3-5
Total Cost Breakdown: Drawing Setup for Under $20
Let’s add it up:
| Item | Cost | Priority |
|---|---|---|
| You Can Draw in 30 Days book | FREE (library) or $10-15 (buy new, $5-7 buy used) | Essential |
| Pencil (whatever you have) | FREE or $3 | Essential |
| Sketchbook | $5 | Recommended |
| Blending stumps | $2-3 | Highly Recommended |
| Kneaded eraser | $2-3 | Recommended |
| Click eraser | $3-5 | Optional (start) |
| Hi-Polymer eraser | $2-3 | Optional (start) |
Bare minimum (borrow book, use pencil you have): FREE
Recommended starter set: $12-15
Complete setup with all erasers: $18-22 (not including book)
You can probably purchase everything on this list for around $20 (especially if you borrow the book from the library!).
What You DON’T Need as a Beginner
Let me save you some money. Here’s what you can skip:
- Expensive pencil sets – You won’t use most of them
- Specialty papers – Start simple
- Fancy sharpeners – Mechanical pencils stay sharp
- Drawing mannequins – Not needed for learning basics
- Rulers and compasses – Unless doing technical drawing
- Fixative spray – Wait until you’re creating finished pieces
Save your money. Master the basics first. Upgrade later when you know what you actually need.
Where to Buy Drawing Supplies for Beginners
Online Options:
- Amazon – Convenient, good for bundles
- Dick Blick (blick.com) – My favorite art supply store
- Outside the US: For the UK: check out Jackson’s Art or Cass Art. For Canada: try DeSerres or Opus Art Supplies. For Australia: look at Eckersley’s.
In-Store Options:
- Blick Art Materials – Best selection, knowledgeable staff
- Michaels – Use their 40-60% off coupons!
- Hobby Lobby – Also has frequent coupons
- Walmart – Some carry drawing supplies
- Your local library – For the book!
Money-saving tip: Sign up for email lists to get coupons. Never pay full price at craft stores.
My Supply Evolution: What I Use Now
Want to know what I added after months of practice?
Before I started the 30 days:
- 9×12 top spiral bound sketchbook
During the first 30 days:
- Mechanical pencil with 2B lead (softer, darker lines)
- Individual graphite pencils (2B, 4B, 6B)
After 90 days:
- Better quality Drawing Pad
- Second smaller sketchbook 8×10
- Micron Ink pens in 3 nib sizes (when I discovered I loved line art!)
After 6 months:
- Molotow Blackliner Pen Set for finished work
- Marvy Uchida LePen Technical Drawing Pen in 0.03mm
- Bristol Smooth Paper for final pieces
The pattern: I only added supplies when I discovered what I actually enjoyed drawing.
Read how I found my style through subtraction
Tools Don’t Make Talent
You can buy a $1,000 easel or a $30 set of high-end pencils, but they won’t draw for you. These tools I recommend are just here to make things a bit simpler without needing a loan, so you can focus on building the skill.
If you have a pencil and paper, you are ready to start. If you have about $5-7 and a dislike for messy hands, grab a sketchbook and a blending stump.
The most important tool isn’t in this list—it’s your willingness to sit down and practice.
Your Next Step: Build Your Drawing Kit
Here’s your shopping list to get started today:
Option 1: Absolute Beginner (Free-$5)
- Borrow You Can Draw in 30 Days from library (FREE)
- Use any pencil you already own (FREE)
- Use printer paper, school paper or junk mail (FREE)
- Optional: Buy a $5 sketchbook if it helps you commit
Total: FREE to $5
Option 2: Committed Beginner ($17-20)
- Buy the book used ($5-6)
- Mechanical pencil with 2B lead ($5)
- Basic sketchbook ($5)
- Blending stumps ($2-3)
Total: $12-15 (if you borrow the book)
Option 3: Complete Setup ($27-30)
- Buy a new book ($12)
- Mechanical pencil with 2B lead ($5)
- Sketchbook ($5)
- Blending stumps ($2-3)
- Basic eraser set ($3-5)
Total: $25-33
Option 4: My Recommendation (Start Minimal)
- Library book (free)
- Whatever pencil you have (free)
- $5 sketchbook (psychological commitment)
- $2 blending stumps (game-changer for clean work)
Total: $7
Then upgrade later based on what you discover you love drawing.
Common Question About Art Supplies
“What is the best pencil for drawing beginners?”
A standard #2 or mechanical pencil. You do not need an expensive set. Mark Kistler uses a simple Pentel P209 with 2B lead.
“Do I need expensive paper to learn drawing?”
No. Printer paper is perfect for practice. You will be doing a lot of drawing, but purchasing an inexpensive sketchbook gives you a way to track your progress. Also, this paper has more “tooth” meaning it holds the graphite better and preforms better when shading.
“What is a kneaded eraser used for?”
A kneaded eraser lifts graphite off the page without ruining your paper. It is a drawing tool, that allows you to create highlights or lighten areas that are to dark. This little gray blob let’s you go from good to wow, think the shine in eyes or the sun kissing a leaf.
“Mechanical vs. Wooden Pencils: Which is better for drawing?”
Both are well suited for drawing and come down to your personal preference. Mechanical pencils do not need sharpening; you just buy more of the grade of lead you need (for most drawing 2B). Wooden Pencils do require a pencil sharpener, but they are more cost effective if you need multiple grades of lead. Here are the lead grades and the best use for them.
| Pencil/Lead Grade | Best Used For |
| HB / #2 | Writing, rough sketching, and initial outlines. |
| 2B – 4B | The Sweet Spot. General shading and visible lines. 2B is easier to erase then HB. |
| 6B – 8B | Deep shadows, dark contrasts, and dramatic depth. |
| H Grades | Technical lines or very light guidelines (hard to erase, tend to indent paper). |
“How do I keep pencil drawings from smudging?”
Place a scrap piece of paper under your hand. Whether you are left or right handed smudging the graphite as you draw can ruin artwork. A simple piece of printer paper placed between your hand and your artwork help stop the side of your hand from messing thing up.
An art glove is another option. This is a glove with only finger-holes for the ring and pinky fingers that covers the side of your hand. It can feel more natural and allow you to still see your artwork as you draw.
From $20 Supplies to Selling My Art
These simple tools helped me go from complete beginner to creating art I’m proud to sell. The sunflower drawing I shared in my last post? Drawn with these exact supplies. The botanical line art you see in my shop? Started with a $0.30 pencil (1 from a pack of 10 that is $3) and a $5 sketchbook. Drawing supplies do not have to break the bank.

You don’t need expensive gear to create something beautiful, or even something sellable.
My Challenge for You Today
Go to Mark Kistlers YouTube Video for Professor Bob’s Day 1 tutorial, grab a pencil and piece of paper, follow along. You will prove to yourself the Gear and Talent Myths are both lies.
After you do please comment about your experience and results.
Previously: How to Learn Drawing at Any Age: From No Talent to Artist at 55
Read Next: How to Find Your Art Style: The Subtraction Method for Beginners
